Get in Gear
Get in Gear
Introduction
Bicycles are an efficient means of human
transportation in part because they have variable gears. Multiple
gears allow the bicyclist to select the appropriate gear ratio to
match his or her power output to the slope and wind conditions.
In this activity we will count gear teeth on a bicycle, calculate the
ratios of the number of teeth on the front chain rings to the number
of teeth on the gears of the rear cluster and then plot the results
on number lines.
Material
Assembly
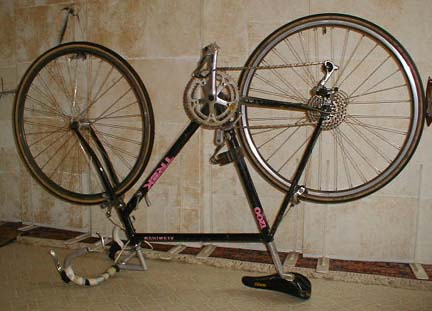
Turn a ten speed bicycle upside down on the floor
or a table.
Balance the bicycle on its handlebars and seat.
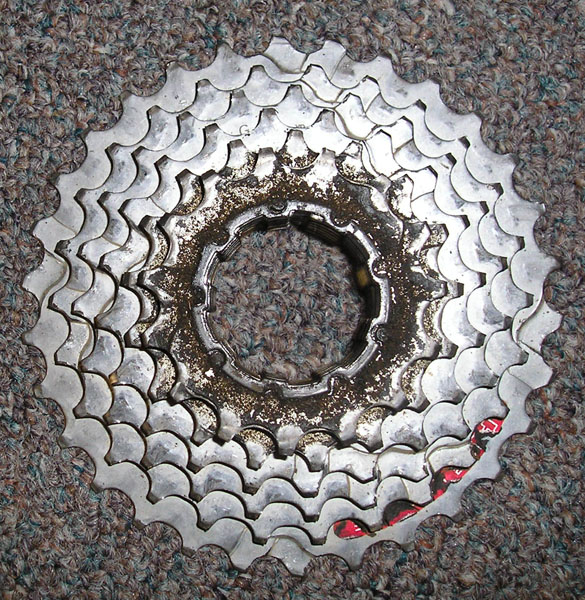
Optional, use the photo of a rear cluster of gears from a mountain bike below count the number of teeth on each gear. Notice that counting is difficult.
To Do and Notice
Introduction
Turn the bicycle pedals in a circle, notice how
the rear wheel rotates when the pedals are rotated. Use the gear
shift to change gears while the pedals are rotating. Use the brake to
stop the wheel.
Notice that the chain connects one of two or more circles of gear
teeth in the front of the bicycle, called chain rings, to one of many
gear rings in the back, called the cluster.
Notice that you can hold the pedal fixed and still make the rear
wheel rotate in one direction (but not the other). This freewheeling
motion allows you to coast downhill without pedaling.
Find the ratio of turns of the rear wheel to turns of the pedal.
Shift the bicycle into the lowest gear, that is the smallest front chain ring and the largest gear on the rear cluster.
Position the pedal so that it is next to some part of the bicycle so that you can tell when you have made one rotation of the pedal.
Find the tire valve on the rear tire. Rotate the rear wheel until the valve is straight up and down or next to some part of the bicycle. (Remember freewheeling)
Now rotate the pedal in one complete circle, and
count the number of revolutions made by the rear wheel. Hold a hand
against the tire so that the rear wheel does not rotate freely. That
is, when the pedals stop rotating the rear wheel should stop too.
Note, you can estimate fractional parts of a circle by counting
spokes. Most bicycles have 36 spokes that are equally spaced around
the wheel. Thus each spoke is 1/36 of a circle from its neighbor, or
10 degrees (1/36 of 360 degrees in a circle.) Some bicycles, like the
one shown above, have 32 spokes.
Write down this number which on my bicycle is
1.4.
This means that every time my feet go around in one circle, the rear
wheel goes around 1.4 times.
Shift into high gear and repeat the above experiment. (High gear is the largest front chain ring and the smallest rear one.) On my bicycle the rear wheel makes 3.7 revolutions for each pedal revolution.
Part 2 Counting Teeth.
Count the number of teeth on the front chain ring
of the bicycle.
This is easiest to do if you mark one of the gear teeth with a small
piece of masking tape.
My bicycle has two chain rings in the front with 39 and 52
teeth.
Have two different people do the counting and make sure that they count the same number of teeth. Around the Exploratorium I'm known for the saying,"counting is difficult."
Count the number of teeth on each of the gears on
the rear cluster, assign number 1 to the largest gear on the cluster,
it is closest to the spokes.
Make a table with one column for each of the front gear wheels and
rows for each of the gears on the rear cluster. For my bicycle this
table will have two columns and 5 rows.
cluster gear # # of teeth ratio front teeth(39)/rear teeth ratio front teeth(52)/rear teeth 1 28 1.39 1.86 2 24 1.63 2.17 3 20 1.95 2.60 4 17 2.29 3.06 5 14 2.79 3.71
For each entry in the table calculate the ratio of
the number of teeth on the front gear to the number on the rear, this
is the gear ratio.
What is the highest gear ratio? what is the lowest?
Compare the gear ratios to the ratios of turns of
the rear wheel to the pedal.
Notice that in any one gear, for example with a ratio of 3.7, the
rear wheel makes 3.7 rotations for every single rotation of the
pedals.
Plot Your Gears and Ratios
Warm up exercise.
Plot the numbers of teeth on the rear cluster
gears on a number line.
Blank number lines are printed out at the end of this
exploration.
![]()
For each of the front chain rings plot the
available gear ratios in a number line.
I plotted the 52 tooth chain ring ratios above the line and the 39
tooth ratios below.
On my bicycle there were 5 points to plot for each
of the front two chain rings.
This graph shows you all of the gears available to you.
Are the gear ratios available using one front chain ring equally
spaced?
On most bicycles they are not.
Do gears produced by one front chain ring differ from those of the
other chain ring? A well designed ten-speed cluster will give you 10
different gears. Notice that no two of the ratios on my bicycle are
the same.
This number line plot of the gear ratios also shows you how to shift your bike through the gears from lowest to highest in order. My bike starts with the two lowest gears on the smaller front chain ring then alternates from one chain ring to the next and finishes with the top two gears on the large front chain ring. This is a pretty good gear arrangement.
Part 3 Ratios of Ratios
For one chain ring take the ratio of adjacent gear
ratios.
That is, what is the:
gear ratio for gear 2/gear ratio for gear 1
For my bicycle the ratio of gear 2 to gear 1 is 1.63/1.39 = 1.17
The next ratio is gear 3 to gear 2 and is 1.95/1.63 = 1.20
gear 4 to 3 is 1.17
gear 5 to 4 is 1.22
For a well designed gear cluster the ratio of one gear to the next is nearly constant across the cluster. The extra force required from your muscles goes up by the same percent with each shift. In my cluster, each gear requires on the average 19% more force.
Part 4. The final ratio
Shift into the lowest gear (small front gear,
large rear gear)
Attach a spring scale to the pedals.
Place one finger between the spokes at the back of the rear
wheel.
Rotate the pedals until the are horizontal and pull vertically up on
one of them with the spring scale. I pull until the scale reads 20
newtons (5 pounds).(Optionally, you can hang a 2 liter bottle full of
water from the other pedal. this will exert a 20 newton force.)
Feel how much force is exerted on your finger.
Remove your finger and the scale and shift into
high gear (large front gear, small rear gear).
Reattach the scale, put your finger in the spokes and pull to 20
newtons again.
Notice that in high gear the force on your finger is smaller while in
low gear it is larger.
Notice that each pedal can rotate about its own
axle.
In high gear, measure the distance traveled by the center of the
pedal axle in one rotation, and the distance traveled by a point on
the outside rim of the rear tire in one rotation of the front pedal.
Calculate the ratio of distances of tire to pedals. (Hint you can
measure the diameter of each circle and multiply by pi.)
In the same gear, pull up on one pedals with a force you choose such as 10 newtons and use another scale attached to the outside of a spoke to measure the force needed to stop the pedals from moving. Find the ratio of these two forces.
Compare the ratio of forces to the ratio of distances traveled.
What’s Going On?
The gear ratio tells you how many times the rear bicycle wheel goes around for each time the pedals go around once.
Low gears are used for accelerating or going uphill while medium gears are used to maintain constant speed, and high gears are used for downhill and downwind runs.
The bicycle gears act like levers. A low gear converts the force you exert at the pedals into another slightly lesser force that acts over a slightly longer distance, while a high gear converts the force you exert on the pedals into a much smaller force exerted over a much longer distance.
In a bicycle, as in a lever, work is force times distance. Energy remains the same through the system so that the force you exert on the pedals times the distance the pedals move equals the force exerted on the rim of the wheel times the distance it moves.
That is:
FpedalDpedal = Ftire Dtire
So, with a little algebra, we can find how the ratio of the force on the pedal to the force on the tire compares to the distance traveled by the pedals to the distance traveled by the rim:
Fpedal/Ftire = Dtire/Dpedal
Notice that the ratio of the force on the pedals to the force on the tire is the inverse of the ratio of the distances moved by the pedals to the distance moved by the tire.
This is the basic reasons that bicycles are very efficient means of transportation. The force applied by the tire to the road can be varied over a wide range while the force applied to the pedals remains constant.
The gear ratio multiplied by the circumference of
the wheel ( for my 27 inch wheel, the circumference is 2.2 m or 85
inches) tells the distance that the bicycle will travel for each
rotation of the pedals.
So in a high gear, the wheel will go a long distance for each pedal
rotation, perhaps 8.8 m. In a low gear ratio the bicycle will go a
shorter distance, maybe 2.2 m . Bicyclists choose a low gear to climb
hills, only going up a little on each pedal rotation, and choose a
high gear ratio on level or downwind runs covering a large distance
with each pedal rotation.
Etc.
The metric system for measuring bicycle gears multiplies the gear ratio by the circumference of the wheel, 2.2 m, to get the distance the bicycle actually travels in that gear for each revolution of the peddles.
The English system (which is mainly used in the United States) multiplies each gear ratio by the diameter of the wheel, (27 inches for my bicycle.) to get a number which allows gear comparisons between bicycles with different size wheels. In the English system a high gear would be a 108 inch gear while a low gear would be 27 inches. To find the distance the bicycle moves forward for each rotation of the pedals multiply this number by pi. This number is the diameter of the wheel of one of the old high wheeled bicycles with the pedals directly coupled to the wheel.
Etc
Another lever used in a bicycle is found in the braking system.
Measure the distance that the brake lever moves and compare it to the distance that the brake blocks move. (Remove the tire to make the measurement of brake block motion.)
Etc
Blank Graphics for classroom use:
Number line for plotting numbers of teeth.
![]()
Number line for plotting gear ratios.
![]()
Number line for plotting the logarithm of gear ratios
![]()
Plot the logarithm of the gear ratios versus the gear number.
ratio front(39)/rear log10 ratio 1.4 0.15 1.6 0.20 2.0 0.30 2.3 0.36 2.8 0.45
![]()
The theoretical goal for designing a gear cluster is to provide equal spacing of the ratios, this would produce equally spaced points on a logarithmic plot. You see that this particular cluster design does not have equal spacing.
Equal spacing of gears on a logarithmic number
line plot means that the gears increase in a geometric series, that
is, each gear is the same multiple of the preceding gear.
Equal steps mean that the gears are equally spaced in difficulty,
each one of my gears is 1.17 to 1.22 times harder than its immediate
lower neighbor.
|
Scientific Explorations with Paul Doherty |
|
2 Dec 99 |