Ray Tracing
Let's catch some rays
Introduction
Tracing rays of light from an object through a
lens or off a mirror can help you to locate an image.
Material
Assembly
To Do and Notice
Lenses
Converging lenses
Let's begin with a common lens that is thicker in
the middle than at the edges.
Most lenses are circular, the axis of the lens is the first
line to remember. If you consider the lens as a wheel the axis of the
lens will be an axle through the wheel. We will consider all lenses
to be thin lenses. Real lenses light bends at both the front and the
rear surface, however if the lens is thin then you can consider the
light to bend at a line through the center of the lens that is
perpendicular to the axis.
Lenses are characterized by focal
points.
The first important rule of ray tracing
is:
Light rays parallel to the axis will all bend so
as to pass through a focal point of the lens.
To find the focal point of a converging lens start
with a distant light source. Find the place where the image made by
the lens is the most pointlike. This will be the focal point. The
focal length is the distance from the center of the lens to
this point. By the way, distant means ten or more focal lengths away,
so after you find the focal point check to see if the source is truly
far away.
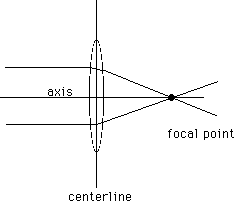
A lens has an axis and a centerline. In a real converging lens
light bends at both surfaces as shown by the upper ray, in the thin
lenses used in ray tracing we model light bending once at the
centerline as shown by the lower ray. Light rays parallel to the axis
all cross at a focal point of the lens.
One of the important laws of optics is the law
of reversibility, if you reverse a light ray and send it back
along its path it will exactly reverse its entire path. This means
that light which passes through a focal point and hits a converging
lens will exit the lens parallel to the axis.
Light rays spread out from each and every point on
an object in all directions, like the spines of a sea urchin. A
converging lens will bend these lines of light so that if the object
is farther from the lens than a focal point, the rays of light will
pass through one point on the other side of the lens. This point is
on the image of the object. There are three rays which are usually
used to find where the image of an object is located.
1. The parallel ray is a ray from
the object parallel to the axis of the lens. It goes through the
focal point on the side of the lens opposite the object.
2. The chief ray passes through the
center of the lens, for a thin lens it is a single straight line, it
is not bent by the lens.
3. The focal ray goes through the
focal point on the same side of the lens as the object. The focal ray
exits parallel to the lens by the law of reversibility.
The image made by a converging lens will appear to
be at the point where these rays cross.
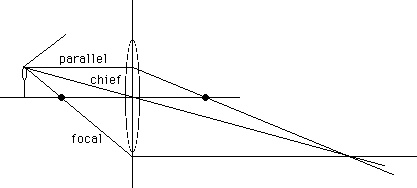
Light rays spread from a point on an object and bend at a lens
to form and image point where the rays all cross. Three rays are easy
to trace. The parallel ray, the chief ray through the center of the
lens, and the focal ray through the near focal point.
Notice that rays can be used to locate images even if they do
not hit the lens, the rays that do hit the lens will make an image at
that spot.
As shown here. an object outside the focal point
of a converging lens makes an image outside the focal point on the
opposite side of the lens. The other case of the object inside the
focal point is also worth drawing.
When light actually passes through the location of
the image, the image is called a real image. A real image can
be photographed by placing film at the location of the
image.
Diverging lens
A diverging lens bends light which is parallel to
the axis away from the axis.
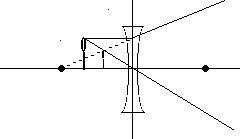
Light from an object is bent away from the axis of a diverging
lens, creating a virtual image.
With all lenses always begin by drawing the chief
ray.
Then with a diverging lens draw the parallel ray
which, after passing through the lens, diverges as if it comes from
the focal point.
The image is located at the intersection of these
rays.
Real light paths are shown as solid lines. The
real light paths never cross at the image location, therefore this is
a virtual image.
Mirrors
For a thin mirror we trace the rays as they bounce
off an imaginary flat plate tangent to the mirror at its axis. The
main difference from lenses is the chief ray which bounces off the
center of the mirror as if it were a flat plate. Notice the parallel
ray, parallel to the axis, and the focal ray, through the focal
point.
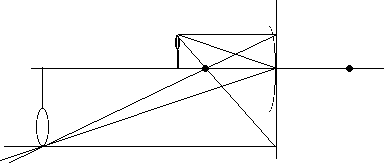
A converging mirror makes an inverted real image of an object
outside the focal point.
The light rays actually cross in this case so they
make a real image.
Diverging Mirror
The chief ray behaves the same for this mirror as
for the converging mirror. The parallel ray bounces off the mirror
and diverges as if it came from the far focal point. The rays appear
to cross behind the mirror, making a virtual image.
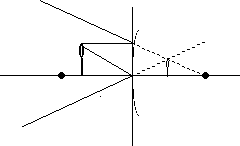
A convex or diverging mirror makes virtual images behind the
mirror.
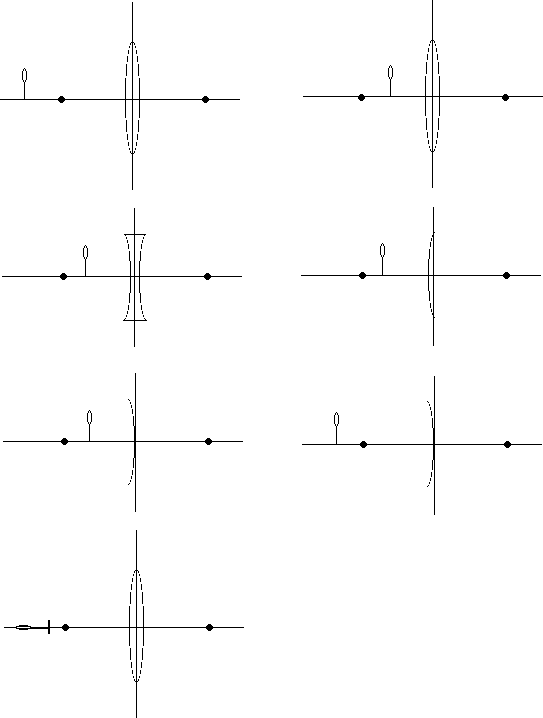
What’s Going On?
Here are some practice drawings on which to draw
rays.
Etc
If you shine a pointer laser through a lens or
onto the mirror the beam from the laser will closely follow the path
of the ray predicted by ray tracing.
Return to Images


