I've seen the image from both sides now
I've seen the image from both sides now
Introduction
Our brain combines two different views of the world one from each of our two eyes to create one three-dimensional perception. In this activity we isolate two different views of an object by sighting through two different soda straws. These two views allow us to find the location of an object or an image.
Preliminary activity
Look at a point with two straws
Look through two straws, one with each eye, at a brightly colored point. Notice how the straws both line up with the point.
Material
Assembly
Make a small dot on the piece of paper.
Place the paper on the table in front of you.
To Do and Notice
Put on glasses or eye protectors.
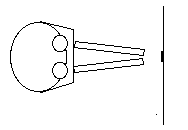
Look through safety glasses and two straws at a dot on a piece of paper.
Look through one soda straw with one eye until you
see the point.
Look through two soda straws, one with each eye until you see the
point through both of them at the same time.
Hold the soda straws in position then back up and look at them. Or do
this activity with a partner and observe the straws while your
partner looks at the point.
Change your distance from the point and note how
the straws change. The two straws always lie on lines which cross at
the position of the point. When your eyes are farther from the point
the straws become closer to parallel.
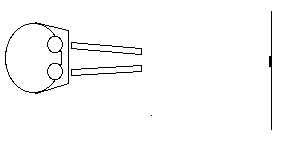
Move the dot away and the straws become more closely parallel.
What's Going on?
Like travels in straight lines.
Light radiates out in all directions from the colored point.
To see the light through a straw the straw must surround a ray of
light coming from the point and going into the pupil of your eye.
Thus when a point can be seen through two straws at the same time the
two straws must be on lines that come together at the
point
Main Activity
Finding the location of an image.
Material
To make the image locator
To make the image
Optional
Assembly
Make an image locator.
Push a pin through one end of each soda straw. Use the pins to attach
the soda straws to adjacent corners of the 9x9” corrugated
cardboard sheet. Push another pin through the other end of one straw
and use it to pin the straw in place parallel to one edge of the
cardboard. One straw will be fixed in place the other will be free to
rotate about one end. See the next image below.
Mount the image locator
Attach the image locator to a photographic tripod with tape, this is
by far the easiest method.
Or place it on a pile of books. Have some magazines handy to adjust
the height of the pile.
To Do and Notice
For practice, find the location of an object with
the image locator.
On a table, place an object which has a highly visible point
associated with it, we prefer a minimag light with the bulb exposed
and turned on, ( you might also use the tip of the wick of an unlit
candle, or the colored-ball head of a pin stuck into a wood
block.)
Move the image locator to the same height as the bulb about 0.25
meter (a handspan) from the bulb.
Look through the straw that is fixed at both ends and rotate the
image locator and change its height until you can see the object. Fix
the image locator in place so that it will not move, e.g. put a
weight in the middle of it if it is one a pile of books, or lock the
head of the tripod.
Look through the straw which is able to rotate. Rotate the straw
until you can see the object through it.
Step back and look at both straws. A straight lines through both
straws will cross at the location of the object.
You could tell where the object is just by looking at the straws!
You do not need to look at the object itself.
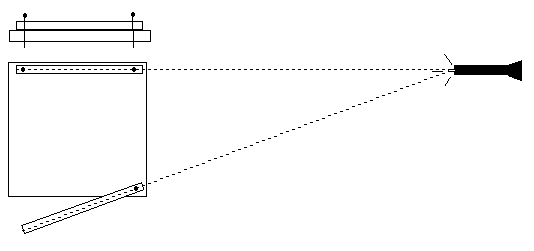 Image
locator, straws attached to cardboard with pins, looking at a minimag
light
Image
locator, straws attached to cardboard with pins, looking at a minimag
lightOptional, pull a string through each of the two straws. Pull both strings taut, and adjust them until each string passes through its straw in a straight line. The strings will cross at or near the point. Or, hold a meter stick over each straw, the light is where the meter sticks cross.
Now it's time to find an image.
First make an image.
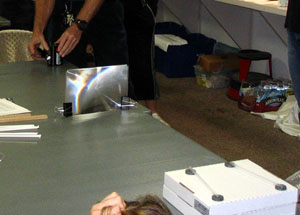
Mount the page magnifier on two binder clips on a table.
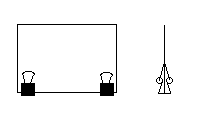
Page magnifier Fresnel lens held by two binder clips, side view also shown.
Place the bare bulb of a minimag light about one meter from the lens, on a line perpendicular to and running through the center of the lens.
Place your head about half a meter from the page magnifier and look through the lens at the light.
 \
\
An eye looks through a Fresnel lens at the lit bulb of a minimag
light on a pile of books.
You will see an image of the light.
Where does the image of the light appear to
be?
Some people see it on the lens others see it between the lens and
their heads.
To find where the image is &emdash; independent of human perception&emdash; do the following.
Mount the image locator about half a meter from
the lens so that you can look through the one fixed straw at the
image of the glowing lamp.
(Place it on the pile of books or use the tripod.)

An eye looks through the straw of an image locator at the image of a minimag light made by a Fresnel lens page magnifier.
Look through the second straw and rotate the straw
until you can see the same point of light viewed through the first
straw. Notice that two lines, one drawn through each straw, will
cross at a point. The point at which the two lines cross is the
location of the image.
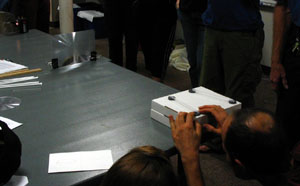
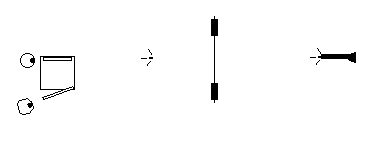
Two eyes use the image locator to find the location of the image of a lit minimag bulb made by a Fresnel lens.
In the suggested setup above, the image is on the
opposite side of the lens from the lamp.
It is more than one focal length from the surface of the
lens.
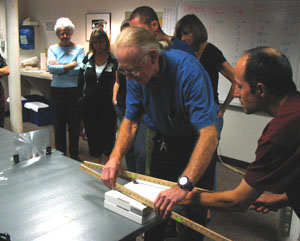
Check your answer.
Check 1
You can check the position of the image by holding a piece of paper
up as a screen between the Fresnel lens and the image locator. Start
with the paper touching the lens. Move the paper away from the lens
until you see an image of the light, in focus, on the paper. How
close was your image location to the location of the image on the
paper?
An image that appears on a piece of paper is
called a real image.
An image on the far side of the lens is called a virtual image. It
will not appear on a piece of paper.
Check 2
Hold a pencil or a finger next to the place where you have located
the image. Look at the image and move your head side to side
horizontally. If the pencil and the image are located at the same
place they will move back and forth together as if they were joined.
However, if the pencil and the paper are at different distances they
will move apart and then together as you move back and forth.
What’s Going On?
Light travels out in straight lines from the
bright point of the lamp.
When the light from the lamp strikes the lens it is bent by
refraction.
Light that starts farther than one focal length (see the etc. below)
from the lens is bent so that it comes back together at a point on
the other side of the lens, the image point. Light that passes
through the image point continues to spread in straight lines from
the image point exactly as it would spread from an object. The light
may then be seen by human eyes.

Two eyes observe two of the many rays of light which travel out of a bulb, and get bent by a Fresnel lens, crossing at an image location.
The eyes and brain reconstruct the image of the bulb. One set of clues from binocular vision and from accommodation of the eye indicates that the image is located at the point at which the light rays cross. This is the point found by the straw image locator.
Another set of clues based on the fact that near objects obscure more distant objects indicates that the image is located on the lens. (See Intro to image finding). Some people give more weight to the obscuration rule and see the image on the lens, others give more weight to the convergence of their eyes and see the image between the lens and their eyes.
When the light from the bulb reassembles at a point it can form an image on a piece of paper.
Etc.
The focal point of a lens is the point to which
light converges when it comes into the lens as a parallel beam
(parallel to a line through the center of the lens and perpendicular
to the lens). A lens has two focal points one on each side, they are
often very nearly the same distance from a lens. Even though we say
that an image is in-focus it is not usually at the focal point.
Advanced Activity
Image location challenge
Create several different images and find their location.
Material
In addition to the material for the main image
location activity
you will need a second Fresnel page magnifier,
Assembly
Find the focal length of your Fresnel page
magnifier lens
Make an image of a distant light source, one that is at least 20 feet
away. Hold a piece of paper near the Fresnel lens on the side
opposite the distant light source. Move the paper away from the
Fresnel lens until the spot of light is smallest, this is the image
of the distant light.
Measure the distance from the lens to the image, this is the focal
length of the lens.

To Do and Notice
Create and locate the following images:
1. Move the bulb twice as far from the Fresnel lens as in the main
activity, locate the image. The image will be a real image closer to
the focal point.
2. Move the bulb halfway between the focal point and the lens. The image will be on the same side of the lens as the bulb, further away from the lens than the focal point. This image is called a virtual image and cannot be seen on a piece of paper because no light actually goes from the object to the lens to the image. Instead the light goes from the bulb and is bent at the Fresnel lens so that it travels out as if it is spreading from the image.
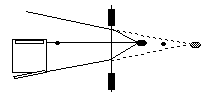
From left to right: image locator, Fresnel lens, bulb, image of
bulb
An image locator observes the diverging rays of light bent by
a Fresnel lens, from a lit bulb.
The rays appear to come from a more distant image bulb, a virtual
image.
Check your answer using technique 2 above: Look at the image through the lens and the image location marker over the top of the lens!
3. Put the bulb close to the focal point. The image will be far away, the straws will be nearly parallel.

Light from a bulb placed at a focal point of a lens is bent into parallel paths by the lens. These parallel rays of light seem to come from a distant light source.
5. Place the bulb 0.25 meter from the Fresnel lens, clip a second Fresnel lens to the first. Find the location of the image made by the lens combination. Two lenses close together bend the light more than each lens alone. Two identical lenses act as one lens with half the focal length.
4. Place the bulb two focal lengths from the lens. The image will be two focal lengths on the other side of the lens. Place a second lens at the location of the image, i.e. two focal lengths from the first lens. The image made by the first lens is inside the middle of the second lens. The second lens does nothing to alter the location of an image that is in its middle. (However see the image relay activity for more about this combination of lenses.)

From left to right: image locator, image inside Fresnel lens,
focal point of next Fresnel lens, Fresnel lens, focal point, light
source
Light from a bulb is bent by one Fresnel lens to form an image in the
center of a second Fresnel lens. The image locator sees the image
inside the second Fresnel lens.
Math Root
If the distance from the center of the lens to an
object is do,
and the focal length of a lens is f,
then the location of the image will be di
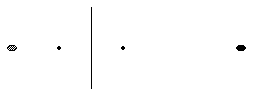
From left to right: image, focal point, Fresnel lens, focal point, object
The location of the image is given by the equation
Combining lenses
A lens with a focal length
f1
placed near a lens with a focal length
f2
behaves like one lens with a focal length of
f1f2/(f1+f2)
The power of a lens is often measured in diopters,
D.
The power of the lens is D = 1/f
when f is the focal length measured in meters.
A 1 diopter lens has a focal length of 1 meter
a 2 diopter lens has a focal length of 1/2 m.
To find the power of two lenses in diopters simply sum their individual powers.
D = D1 + D2
|
Scientific Explorations with Paul Doherty |
|
22 May 2000 |